Blog, Garden Blog, Garden Tips, News and Tips
Crafting a Floral Decoupage Pumpkin: A Step-by-Step Guide
Oct
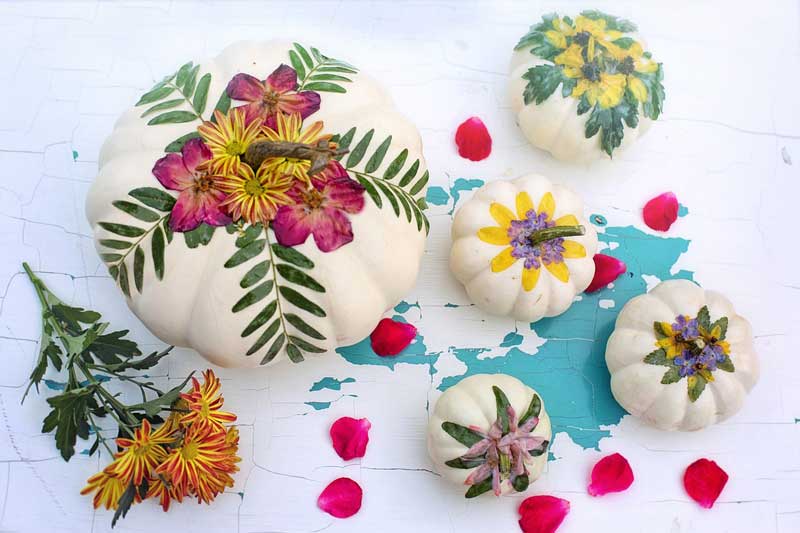
As autumn arrives, it’s time to get creative with your seasonal decor. Imagine a stunning centerpiece that combines the warmth of a pumpkin with the beauty of blooming flowers, grasses, and leaves. In this guide, we’ll show you how to create a breathtaking floral decoupage pumpkin that will add a touch of nature’s splendor to your fall celebrations.
Section 1: Gather Your Materials
Before we dive into the crafting process, let’s ensure you have everything you need:
Materials:
- A pumpkin (choose one with a smooth surface)
- Mod Podge or decoupage glue
- Foam brushes
- A variety of dried or silk flowers (pansies, mums, daisies, etc.)
- Assorted leaves, grasses, and other natural elements
- Craft scissors
- A bowl of water
- A small paintbrush (for precision)
- Optional: acrylic paint (to match your chosen color scheme)
Section 2: Prepare the Pumpkin
- Select Your Pumpkin: Begin by choosing a pumpkin with a smooth surface. Its size depends on your preference; smaller pumpkins work well as tabletop decorations, while larger ones can be showcased as centerpieces.
- Clean and Dry: Wipe the pumpkin’s surface clean and ensure it’s dry before you start crafting.
Section 3: Prepare the Floral Elements
- Trim and Arrange: Carefully trim the stems of your dried or silk flowers, leaves, grasses, and any other natural elements you plan to use. Organize them into small, easily accessible piles.
Section 4: Begin the Decoupage Process
- Base Layer: Start by applying a thin, even layer of Mod Podge to a small section of the pumpkin’s surface. You can also mix a small amount of acrylic paint with the Mod Podge if you want to match the pumpkin’s color to your design.
- Attach Flowers and Leaves: Place your chosen flowers, leaves, and grasses onto the glued area. Overlap them slightly for a natural, layered effect. Press them gently to adhere.
- Apply Mod Podge: Brush a layer of Mod Podge over the top of the floral arrangement, ensuring that all elements are coated. This will help seal and protect the flowers.
- Repeat and Build: Continue this process, working in small sections at a time. Overlap and vary the placement of your floral elements to create an organic, textured design.
Section 5: Precision and Detail Work
- Use a Small Paintbrush: For intricate or small areas, use a small paintbrush to apply Mod Podge and attach delicate flowers or leaves.
Section 6: Finish and Seal
- Seal the Design: Once you’ve covered the pumpkin’s surface to your satisfaction, apply a final layer of Mod Podge over the entire design. This will seal your creation and protect it from moisture.
Section 7: Let It Dry
- Drying Time: Allow your decoupage pumpkin to dry thoroughly. This may take a few hours to overnight, depending on the thickness of your layers.
Section 8: Display Your Floral Decoupage Pumpkin
- Choosing a Display Location: Your stunning floral decoupage pumpkin is now ready to adorn your home. Place it as a beautiful centerpiece on your dining table, as an eye-catching decoration on your porch, or wherever you’d like to add a touch of autumn elegance.
With a little creativity and the natural beauty of flowers, leaves, and grasses, you can transform an ordinary pumpkin into a unique and enchanting fall decor piece. This floral decoupage pumpkin will not only showcase your crafting skills but also capture the essence of the season’s splendor. Enjoy your creation and the cozy atmosphere it brings to your home this autumn.